Amplified's intuitive Flow Builder allows you to easily customize and edit your workflows, allowing you to create simple to complex automation without writing a single line of code. Our flow builder gives you a bird’s-eye view of your entire workflow and helps you visualize how each step fits into the bigger picture.
With automated workflows, you can send the right emails or SMS messages to the right people at the right time.
Flow Builder Components
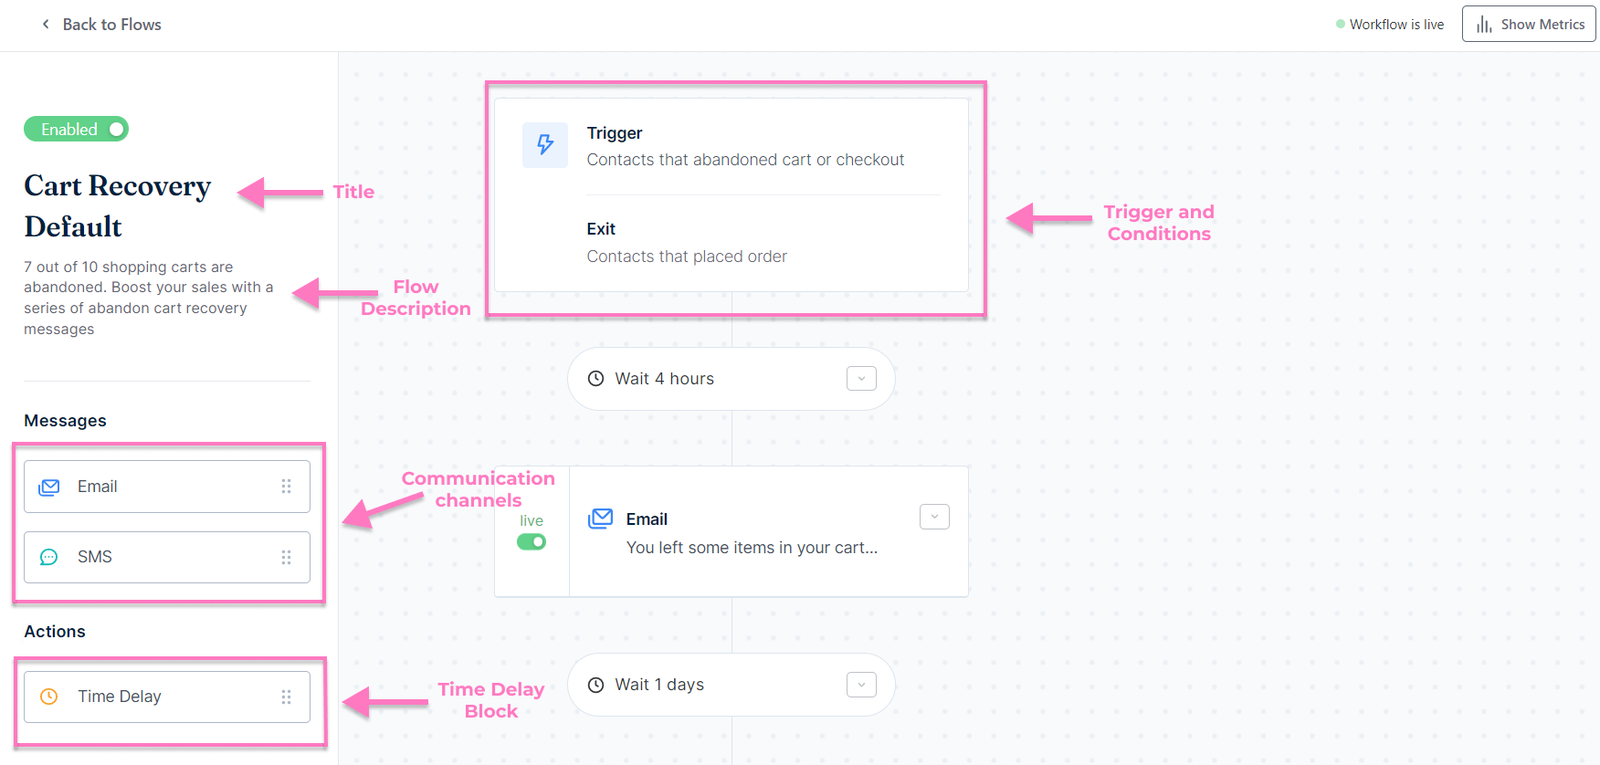
Title and description
The flow's title, which appears in the left-hand pane, can help you identify what each flow is for. The description, which appears below the title, helps explain what the flow does and why it exists.
Messages
Amplified lets you send messages through two channels: email and SMS. These messages get sent out when an action triggers a flow.
To add an Email or SMS message to your flow builder, simply drag the message block into the editor. You can customize these messages so that they're personalized for your recipients. To do so, click on the drop-down symbol on the right-hand side of the block and click Edit.
For more information on how to edit email and SMS content, read these articles:
- Email Editor
- SMS Message Editor
Actions
These are Time Delays that can be added to your flows. A time delay is the amount of time that should pass between one step and the next in a flow. You can set a delay to any number of minutes, hours, days, or weeks. If you have message blocks back-to-back with no time delays, they will occur simultaneously. Emails and SMS messages in a flow series will be scheduled relative to one another.
Triggers and Conditions
Triggers and conditions are two important components of automated workflows. The trigger is the event or action that initiates the flow. The conditions, on the other hand, are the specific criteria that must be met for the sequence to be executed.
Enter Condition
The entry condition determines the requirements a contact must meet to be included in the automated flow. It involves a set of predefined rules and triggers that determine if a contact is eligible to receive a series of emails or SMS.
Amplified offers two triggers for entry conditions: event-based triggers and date-based triggers. This allows you to select the trigger that best suits your workflow based on your requirements.
-
Event-based trigger
An event-based trigger is a specific action that a contact takes, such as placing an order or signing up for a newsletter, which triggers the start of an email or SMS sequence.
Some common examples of event-triggered flows include:
- Cart abandonment (triggered when a customer abandons a cart)
- Welcome email (triggered when a contact signs up for your newsletter)
- Post-purchase (triggered when a contact purchases something from your store)
💡To narrow the scope of your flow, you can also use trigger filters. Trigger filters are useful for narrowing down and identifying the appropriate audience for your emails or messages. -
Date-based trigger
The date-based trigger is a specific date or time that is set as the trigger for the automated flow. For example, the trigger may be set to send a series of promotional emails leading up to a specific holiday or event.
Exit Condition
Exit conditions determine when a customer should be removed from a flow. Once an exit condition is met, the automated workflow created in Amplified will stop sending messages. For example, a cart recovery flow may be set to stop sending messages once a customer places an order.
Re-entry condition
A re-entry condition determines whether a contact can re-enter a flow after exiting it.
-
Never
Contacts are not allowed to re-enter the flow after exiting.
-
Always
Contacts can re-enter the flow after exiting.
-
With Delay
Contacts can re-enter the flow after exiting, but with a time delay.
Metrics
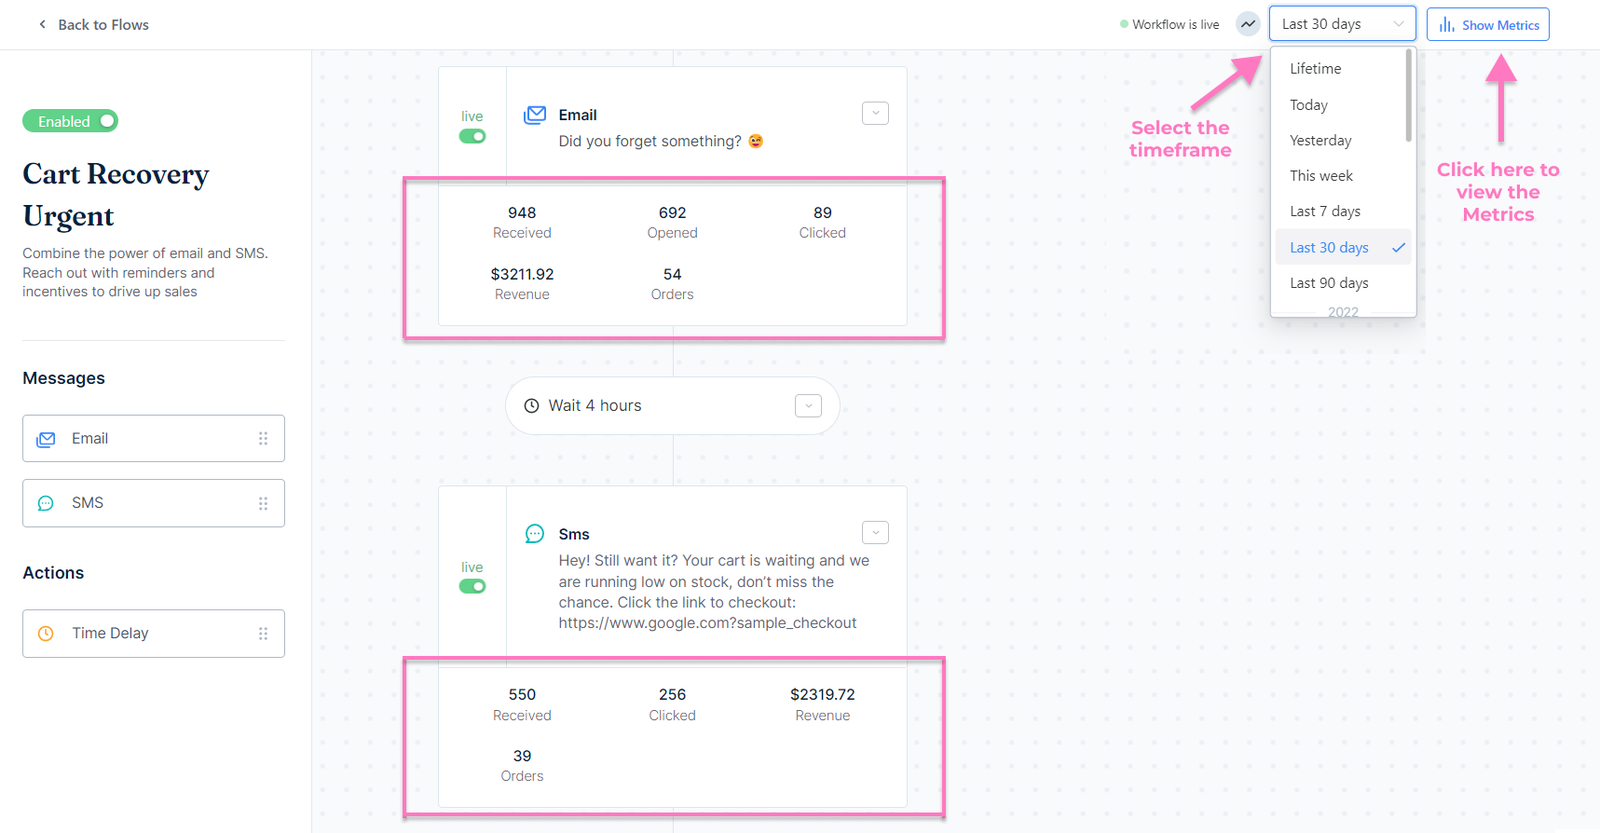
A powerful feature of our flow builder is the ability to show metrics directly within the tool. To understand how a flow is performing:
- Click “Show Metrics” on the top header menu.
- Select the timeframe for which you would like to view the metrics. After selecting a timeframe, you'll see the key metrics for each channel.
For each flow, you will see the following analytics:
-
Open Rate (Email Only)
This metric shows how many people opened the email. Tracking this will tell you how effective your content is at getting your message across.
-
Click Rate
This metric measures how many recipients clicked on your email or SMS links. You get a sense of how well your links communicate their purpose and value.
-
Received
This is the total number of emails sent out by the system.